This is an article following the previous one in a series about Modern Design Experience [UiPath] Modern Design Experience – Part 1: Introduction + Use App/Browser and its activities. In previous article I made some introduction and showed you how to work with Use Application/Browser activity.
Video - watch and/or read the article 


This article is about Click activity. If you are already familiar with Click activity from Classic Experience, you will be probably amazed by some of the new cool features. If you are just learning UiPath and have no previous experience with any Click activity but you decided to learn on your own using Modern Experience, you will also be amazed  .
.
One of the first difference that defines Click from Modern Activities is that it can be only used within Use Application/Browser scope. It cannot just be somewhere standalone. This may for the first moment feel like making the workflow longer and maybe more bulky, but it will be balanced by some new cool abilities.
So once you have your Application/Browser scope ready, insert the Click activity in.
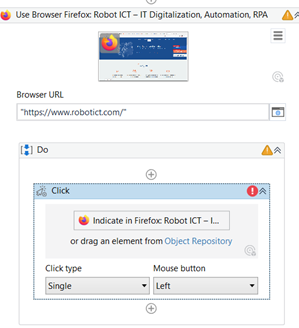
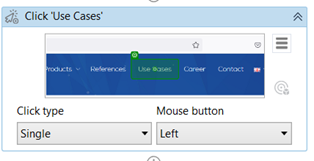
As an example I am using Firefox browser and our company website. The goal of this example will be to click on „Use Cases“ in the menu.
So after clicking on „Indicate in …“ (whole new and upgraded) Indicate Target tool will appear.
A little window is telling us that we can use F4 to try changing the detection framework, F2 for pause the configuration and other options that you are probably familiar with. Only the design looks a bit different. Click to indicate your element.
You can hit Enter to confirm your selection. But I guess you want to explore all the possibilities that you have now. If you move your mouse around and click you can indicate Anchor for your element (you can even indicate more than one anchor now!). If you are unhappy with your selection hit the rubbish bin icon. If you want to cancel the operation, hit Escape. Play around and experiment what all those new buttons are doing.
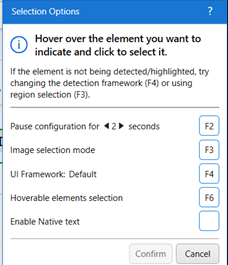
Let’s check the new sub-window that appeared below the first one:
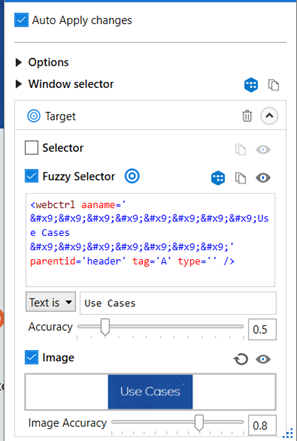
You can see the Target section has three main possible targeting methods: Selector, Fuzzy Selector and Image. If the method is selected (ticked), it will be used. So Selector is the standard way of finding an element. Fuzzy Selector is using Accuracy scale and allows slight changes to the selector. You can read about fuzzy Selectors here). These two Selectors can be also adjusted by opening UiExplorer (click the UiExplorer blue icon) as you would do when using Classic Activities and you want to fine-tune the selector. Last one is Image and is using Image Recognition to locate the element.
The order of these is crucial. UiPath will try to find the element based on selected methods from top down. In our example picture it will first try to find Fuzzy Selector. If it cannot find it – as a fallback – it will try to find the element by the image. If this will fail, the whole activity fails.
In our example the Selector is not selected, as this is default settings for browser automation. You can change the default behavior in Project Settings.
If you do changes in the selectors – and if you have the checkbox „Auto Apply Changes“ ticked – the selector will update and the blue target icon will indicate which of the method was successful with indication. Or you can just click „Validate“ and see.
So these were the basics. There are few more buttons that I did not talk about but this will be your homework to try and experiment with them which is the best way how to learn how they work.
Now lets hit Confirm button and see how the activity looks now.
If you click the hamburger menu you will also notice some changes.
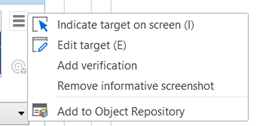
Using Edit target will open the target indication tool. With Modern Activities you can use the benefit of Object Repository and also here we have the option to add the element to Object Repository. One cool option here is Add verification. Read more to know what this cool thing is doing.
Properties
We should have a look at the properties. There are many of them so let’s go top down one by one.
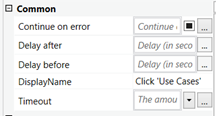
A section called Common is not bringing many upgrades. Only Timeout is now in seconds. Rest of the properties are self-explanatory.
Next is section Input – the biggest one. Click type and Mouse button define what kind of click you want to use. Cursor motion type sets if you want your cursor to move instantly or to mimic human and go in a smooth move.
The sub-part Target contains Click offset that you are most probably familiar with. This allows to set where in area of the element should it click and if necessary you can define offset in pixels from that point.
We can see Selector and Fuzzy Selector and that is where you can also check them and edit them „in the old style“ just by clicking the three dots button next to it.
Native text is used for some legacy apps where classic Selectors don’t work. That is all I know.
If you tick the Responsive websites checkbox, your anchor that is set to left from the element will be also searched from top of the element. I am not sure if I would ever use it but it may come handy one day.
The Targeting methods is a dropdown with options that allow you to do the same thing like you can do from the target indicating wizard.
Wait for page load is also not new thing. You can set to wait for the page to fully load and only after that execute the click activity or also you can set it otherwise.
Where it comes to be interesting is the Window selector (Application Instance) property. By default it is the copy of your App/Browser activity selector. But you can hack the activity to work with totally other window by changing this selector. When it can come handy? Let’s say you automate some process where you click on a lot of buttons and in one moment some popup will appear. And that popup is comming from a different application. If you try to indicate it you may get this popup:
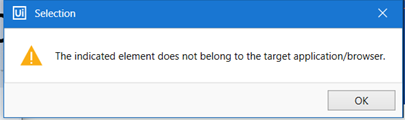
It is because it does not belong under the browser/app scope that you work in. So instead of having one new Use Application/Browser scope to just perform this one click (you can do that of course), you can setup 1) the Window Selector and then 2) the selector of what you want to click on – but not using the targeting/indication tool, rather opening the Selector Editor from Properties – Selector.
The super nice thing to check is the Verify execution set of properties. You can activate it from hamburger menu – Add verification or by changing the property to VerifyExecutionOptions and in the new properties that will appear change Target to TargetAnchorable.
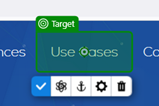
Let’s try to do it via the hambureger menu. I will click on „Use Cases“ myself so I am present on the page where I wish that original click will bring me. Click hamburger menu – Add verification – Indicate verification target on screen and select something that is now present but it was not before. For example header – Use Cases. Again you can play around with selectors same way as you would do for the initial target. Then hit Confirm. Let’s see what properties can we now adjust:
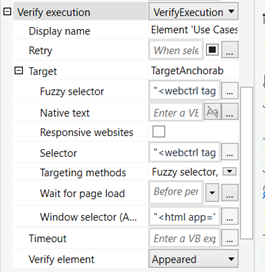
Most of them you already know because they work same way for the verification target/element as for the original target/element. One of the new properties is Retry. So in case the click will not result in accessing the verification element, if you set this to True, UiPath will try to click it again… and again… untill the Timeout will not pass. Verification target has its own Timeout. Also you can use the verification not only to verify something appeared, but also that something disappeared by using the property Verify element.
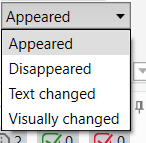
In fact, even more! You can set the verification on an element and check if its text will change or if it will visually change! So many options!
I personally find this verification feature super cool. I think it will make automations more stable. If you would like to re-create the behavior using Classic activities you would need few more extra activities and maybe even one extra variable, If condition and so. So where initially you may feel like the Modern principles are bringing extra „code“ in your workflow, here it pays off.
It is time to not forget about the last set of Properties.
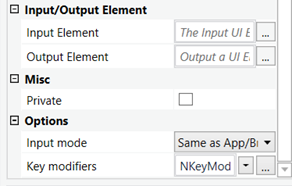
The Input/Output Element allow you to use previously stored UiElement (from a variable of that type) and/or also to store the element that you just found for next activities.
Options part allow you to set Input mode. The best option is the default one: Same as App/Browser. If you leave all your activities inside App/Browser scope like this you can bulk-change their Input mode. How cool is that! 
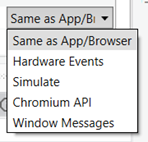
Also note that on addition to Classic Activities you can also set the Chromium API, but about this maybe next time or do your own research 
Is that all? Quite a lot of things on one little Click activity, right?
Continue reading next part: [UiPath] Modern Design Experience – part 3: Type Into
HAPPY AUTOMATION!