Welcome to this first article about UiPath Modern Activities. You may already heard about them but maybe you are still not sure when and how to use them. In fact – they are very easy to use and their usage can bring a lot of benefit especially making your automation more robust and flexible, your code less bulky and UI automation more pleasant.
It is hard to cover every feature that modern activities have so I advice you to try play with them, experiment and explore 
Also you can only take advantage of Object Repository when using the Modern Design activities.
[UiPath] Object Repository, Descriptors - define and migrate selectors across processes
Modern Design activities also have advanced Data Scraping techniques and few new activities like Mouse Scroll. You will also enjoy enhanced UiExplorer and activities with selector fallbacks.
How to start using it
Go to your Project Settings (the gear icon) and in General panel, toggle the last option „Modern Design Experience“ to Yes.

Save the settings, it will reload the project.
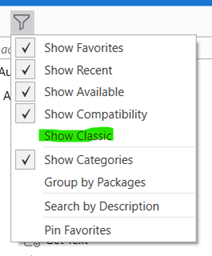
As a result of this, activities under Ui Automation will change. However, in case you still want to work with one of the Classic activity, you can make them visible – click the funnel icon and tick „Show Classic“. It works also other way around. If you are working in a project that has Modern Design Experience turned off, you will see in the funnel menu the option to „Show Modern“. So these activities are till some extend cross-compatible and you can combine them within one project/process.
To distinguish between the classic and modern activities is simple. The modern activities have all a little eye-like looking icon next to their icons.
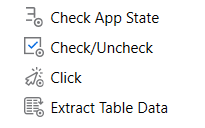
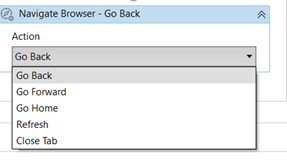
When comparing the classic and modern activities you will find out that there are much less of the modern ones in comparison to the classic ones. That is also due to the fact that some of the classic activities have been merged into a single modern activity. For example Modern activity Navigate Browser can do the job of all these classic activities: Go Back, Go Forward, Go Home, Refresh and Close Tab. Isn’t it cool?
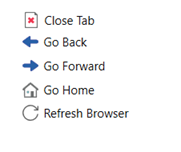
→ to →
In this article, I will describe how to work with these modern activities: Use Application/Browser, and in following part II. - TypeInto and Click, which are probably the most common things you will start with in your automation. As an example I will use the www.robotict.com website.
Use Application/Browser
Let’s drag and drop this activity that is a covering functionality of classic activities Open Browser, Attach Browser and Open Application and in some way also Close Application and Close Tab.
Explore the Properties of it. Many new useful things have been added.
Let’s check them out top down and learn about them.
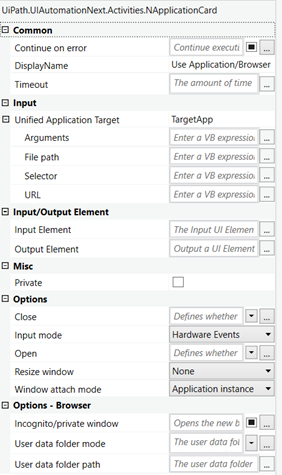
Continue on error and Display name work standard way.
Timeout represents a duration for how long UiPath will try to execute this activity until it will throw an exception. The new thing here (and that is common for all Modern Activities) is that the time is not entered in milliseconds but in seconds!
Inside the Input – Unified Application Target are properties that are auto-filled once you indicate the target. You can try to experiment with different applications and see how these fields get filled in and eventually alter them to your needs.
The Input/Output Element is also a known thing from classic activities and can be used to re-use alive element or to keep the element (of the app or browser) saved for next steps in your workflow.
The Options part is where it starts to be interesting. Close has these options: Always, Never and IfOpenByAppBrowser. It is quite understandable what Always and Never is doing. The IfOpenByAppBrowser means that UiPath will close the application or browser only if it has been opened by the activity itself, so if it wasn’t already opened. The next logical related property is Open that has Always, Never and IfNotOpen options. I think it is clear how to use it and I personally find it as a very nice thing that you can setup. There are scenarios where you may be unsure if to use Attach Browser or Open Browser (from the classic) and this is a neat solution – decide what should the behavior be. 
The default values can be found in Project Settings (like for all properties which fields are „empty“).
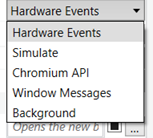
In Input mode you can choose between: Hardware Events, Simulate, Chromium API, Window Messages and Background. You can read about each from these input modes in the documentation and I guess some names are familiar to you. Especially the Simulate and Window Messages. If you set this for example to „Simulate“, it will try to execute all UI interaction activities inside in simulate mode – like „Simulate Type“ and „Simulate Click“ set to True. Isn’t it cool? You don’t have to set this activity by activity one by one anymore!
Resize Window handles the size of a window. Simple as that.
To understand Window attach mode, let me quote the documentation:
Application instance: Inner activities search the indicated application instance, including all parent and child windows (alerts, popups, etc). Other instances of the application are excluded.
Single window: Inner activities search only in the indicated window.
You may need to experiment a bit with this one.
The last part Options – Browser is only related in case you are using this activity with a browser.
The Incognito/Private window property will allow you to open the browser in anonymous window.
The last two options are related to Picture in Picture automation and since this is a bit more complicated to explain, I would love to point you for now to the official documentation of the activity and also to this article:
Thank you for reading, I hope you learned something new. Signup to this forum so you won’t miss when I will publish next part. Next part will be about Click and Type Into modern activities. Stay tuned!
If I did not cover some detail, you can always refer to the official documentation.

Continue reading about Modern Design Activities: [UiPath] Modern Design Experience – Part 2: Click


